Tuesday, July 17, 2012

Calmark Cover, Part 2

We firmly believe in the saying, "Your possessions possess you." Whatever you own, it invariably runs your life. Forevermore you've got to store it, dust it, wash it, fix it, move it, search for it...


...and in the case of the new camper cover, you've got to pad it. This was something we did not anticipate before the purchase. Where was the big warning in red letters, scrolling continuously across the website: "Caution -- Padding sharp edges to protect your camper cover may take over your life!" and just below it, "Once you get the padding and cover onto your camper, you won't dare remove them because you'll just have to put them back on again later. You may never go camping again!"


Oooh, Pollyanna, you sound remarkably negative today. Yes, Pollyanna sometimes loses it when Great Husband gets cranky, and the cover keeps making Great Husband cranky. 


We glued pieces of pool noodle together
 and slid them around vents.


Most of the padding methods we were using in the previous blog entry were disappointing in one way or another. So we came up with new ideas, chiefly using pool noodles. They are light and they don't absorb water. The big goal is simplicity and ease, and we hope we've made progress with respect to the padding. 

Still, it is not at all easy to put the cover on. That part just has to improve or it's a threat to spontaneous camping trips. Plus I'm hearing grumbling about buying a taller ladder. Oh, no! Another possession!

P.S.--don't miss Calmark Cover, Part 3, in which there is a happy ending to all this.


Pool noodles glued together surround the air conditioner.
But when we dragged the cover over these noodles, the glue started popping apart.
Now the noodles are bound with bungees.

Foam pipe insulation pads the awning arm.


Sheets of foam pad the bumper ends.
We no longer cinch up the draw cord in the bottom hem of the cover.
That created pockets at the corners that collected water and had to be drained after every rain.

Thursday, June 7, 2012

Calmark Cover, Part 1

Our Escape 19 now has a custom cover made by Calmark Cover Company in California. We measured the trailer for the dimensions requested by Calmark and also sent them photos. Service was quick and we had the cover within two weeks of placing the order. The cover is made of Sunbrella fabric and has a handy zippered access panel at the door. Calmark Covers also have "FSR construction and friction reducer tie straps" and a 6-year warranty. FSR stands for Fabric Stress Reducer, which is a system of non-abrasive webbing straps at 4-foot intervals across the roof, and connected to the side panels. This seems to be a feature unique to Calmark-made covers. 

The cover came with grommets in the hem, meant for holding the cover down with bungee cords under the camper belly. As the cover first came from the factory, these grommets were not conveniently located for the Escape 19. Some were blocked by the tires, and others were not positioned directly opposite each other from side to side. When I called Calmark with this complaint, they quickly sent us a grommet kit, including installation tools, so we could install additional grommets where necessary. 

Calmark Cover on the Escape 19, with zippered panel at the door
The black straps which come on the cover are made overly long with the expectation that the customer will cut them off at whatever length is desired. We were initially dismayed that one of these black straps goes right across the zippered door panel, but Calmark explained to us that sometimes this is unavoidable because the black straps must align with one of the FSR straps in the roof. We have found it is not at all hard to release the buckle of the black strap when we need to use the door.


Fortunately the front of the cover is well-marked.
In the hem of the cover, there is a white cord to draw up and pull the cover fabric under the camper belly. In these photos, we don't have the cord cinched and tied as neatly as might be possible.


The first installation of the cover onto our 19 was a humorous effort involving Three Stooges and a ladder, but we withhold judgement on the difficulty of the task until we have more experience.


The cover weighs about 32 pounds.

It's very important to protect the cover fabric from any sharp edges. For now, our padding efforts include two swimming pool noodles running lengthwise over the air conditioner, old socks stuffed with rags and stretched onto the ends of the bumper, foam rubber squares on top of the two circular roof vents, and some pieces of foam pipe insulation at the ends of the awning. We have this last form of padding under further review for something better. And it looks like we should also add some padding for the awning arms.


Calmark adds extra size for protrusions such as bumper,
spare tire, air conditioner, and Maxx fan.

Monday, May 28, 2012

Escape 19 Photos, Bathroom

BTW, the door alone isn't meant to keep water in, so the
camper comes with a shower curtain to cover it.


Escape 19 Storage, Photos Above the Queen Bed

Left side

Right side

Escape 19 Storage, Photos Under Queen Bed

Looking through the outside hatch into the under-bed storage --
This shot is toward the back left corner of the trailer and includes the power cord.

Rotating right to see toward the left side of trailer, including the
water heater in the center and water pump on the right

Rotating further right to see through the open under-bed cabinet doors.
 That's part of the wheel well on the right.

From inside the camper, looking through the open under-bed
cabinet doors toward the outside hatch

Looking from the open under-bed cabinet doors toward the power cord and water heater

Escape 19 Storage, Photos at the Dinette

Above the bench on the left side
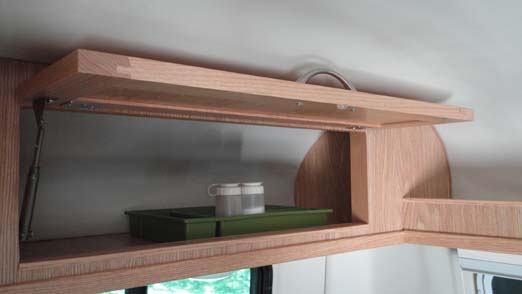
Nice open shelf spanning the front of  the camper,
Kleenex, cups, and t.p. are shown just for scale.

Above the bench on the right side

This is the optional extra door going into the storage under the right bench

Same bench showing hinged plywood access panel on the top

Same bench opened up. Here we keep miscellaneous tools
and an electric space heater.
 
Confusing photo looking down inside the other dinette bench.
On the left, that's our portable propane stove sitting on top of the black water tank,
and on the right we have a little crockpot in a box.
The rest is converter and battery charger, so there's not too much storage space here.

Escape 19 Storage, Photos near the Refrigerator

Shallow cabinet under the refrigerator

Standard closet with rod, between refrigerator and bathroom